v2-v3里面嵌v4页面
v3 系统 以公司 50.67 举例
1. vue-client 1.24.110 23年 已经修改了相关的东西 所以 相关 v3 程序不需要动
2. system-clients 3.2.76 以上版本 23年 已经修改了相关的东西 所以 相关 v3 程序不需要动
3. v4打包 和正常 v4 程序打包一样, 放的位置一样
4. 资源管理配置

// 配置的测试系统的地址
// http://192.168.50.67:31567/revenue-web/userfiles/userFilesManage
// 地址说明:http:// 是请求协议
// 192.168.50.67 是访问nginx地址的 ip
// 31567 是访问nginx地址的端口
// revenue-web 是静态资源的转发,这通常是固定的,营收是 revenue-web 安检是 safecheck-web
// userfiles 这是智慧燃气下面��的一个菜单里的 link
// userFilesManage 这是智慧燃气下面的一个菜单里的 一个页面的 link
// 比如 这是现在的路径菜单配置
// ├─客服系统
// ├─智慧燃气
// └─档案管理 userfiles
// └─用户档案 userFilesManage
配置的功能链接 就是 http://192.168.50.67:31567/revenue-web/userfiles/userFilesManage
5. nginx 配置相对于 之前v4 的配置 加了一个 try_files
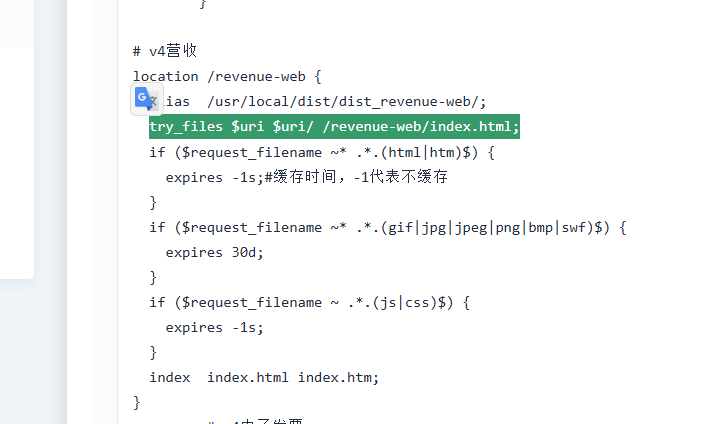
try_files $uri $uri/ /revenue-web/index.html;
成功访问,如果有问题 请更新最新的v4前台试试
v2 以洪雅燃气举例
v2/v3 项目需要 crypto-js 包 自行引入
注意此处定义v2 是指 资源管理有单独一个数据库organization库,并且资源管理是银光的页面
业务代码修改
一、登录修改
登录时候把 ��登录账号密码存到 Util.f 中,v3 的是 vue.$login ,v2 还是 Util.f
import cryptJS from '../../plugins/EncryptUtil'

Util.SinglePageToken = cryptJS.AESEncrypt(JSON.stringify({name: ename, password: password}), "3KMKqvgwR8ULbR8Z")
// EncryptUtil.js 插件内容

import AesEncryptJS from "crypto-js"

export default {
    /**
     * AES加密
     * @param word
     * @returns {*}
     */
    AESEncrypt(word, encryKey){
        var key = AesEncryptJS.enc.Utf8.parse(encryKey);
        var srcs = AesEncryptJS.enc.Utf8.parse(word);
        var encrypted = AesEncryptJS.AES.encrypt(srcs, key, {mode:AesEncryptJS.mode.ECB,padding: AesEncryptJS.pad.Pkcs7});
        return encrypted.toString();
    },
    /**
     * AES解密
     * @param word
     * @returns {*}
     */
    AESDecrypt(word, encryKey){
        var key = AesEncryptJS.enc.Utf8.parse(encryKey);
        var decrypt = AesEncryptJS.AES.decrypt(word, key, {mode:AesEncryptJS.mode.ECB,padding: AesEncryptJS.pad.Pkcs7});
        var ret = AesEncryptJS.enc.Utf8.stringify(decrypt).toString();
        try{
            return JSON.parse(ret) ;
        }catch (e){
            return ret
        }
    },
}
二、 增加 iframe 渲染页面
<template>
  <div id="EmbbedPage">
    <iframe class="embbedpage" :src="getUrl()" frameborder="0"></iframe>
  </div>
</template>
<script>
import * as Util from './Util'
export default {
  title: '内嵌网页',
  props: {
    domainName: {
      type: String,
      default: '#'
    },
    title: {
      type: String
    },
    compName: {
      type: String
    },
    // 当前登录用户信息
    login: {
      type: Object,
    },
    // 当前登录用户信息
    param: {
      type: Object,
    }
  },
  ready() {
    // 把登录信息保存到父窗口中
    window.login = this.login
    // 把参数保存到父窗口中
    window.param = this.param
    if (this.compName) {
      window.comp = this.compName
    }
    if (this.title && this.$parent) {
      this.$parent.setTitle(this.title)
    }
  },
  methods: {
    getUrl() {
      // 在url 结尾 拼接token信息
      let token = Util.SinglePageToken
      let url = this.domainName
      if (url.indexOf('?') > -1) {
        url += '&tokenV2=' + encodeURIComponent(token)
      } else {
        url += '?tokenV2=' + encodeURIComponent(token)
      }
      return url
    }
  }
}
</script>

<style lang="less" scoped>

#EmbbedPage {
  height: 100%;
  width: 100%;
  text-align: center;
  border: 0;
  overflow-y: hidden;
  iframe{
    height: 99%;
    width: 100%;
    border: 0;
  }
}

</style>
三、点击菜单时转到 iframe 页面
open(row) {
    console.log(row.data)
    if (row.data.navigate) {
        this.$goto('embbed-page', {
            domainName: row.data.navigate,
            title: row.data.name,
            compName: row.data.link
        }, 'main')
    } else if (row.data.link) {
        this.$goto(row.data.link, {f: this.functions}, 'main')
    }
}
资源管理配置
- 比如我现在v4项目中 有一个 发票管理/发票查看界面
- 发票管理路由是 InvoiceManage
- 发票查看页面是 QueryInvoiceList
- 完整路径是 /InvoiceManage/QueryInvoiceList
- 那么我现在需要在营收系统同级 先添加一个菜单
智慧燃气 - 那么我现在需要在营收系统同级 先添加一个菜单
发票管理功能连接 是 InvoiceManage - 那么我现在需要在营收系统同级 先添加一个功能
发票查看功能连接 是 QueryInvoiceList - 如下图所示
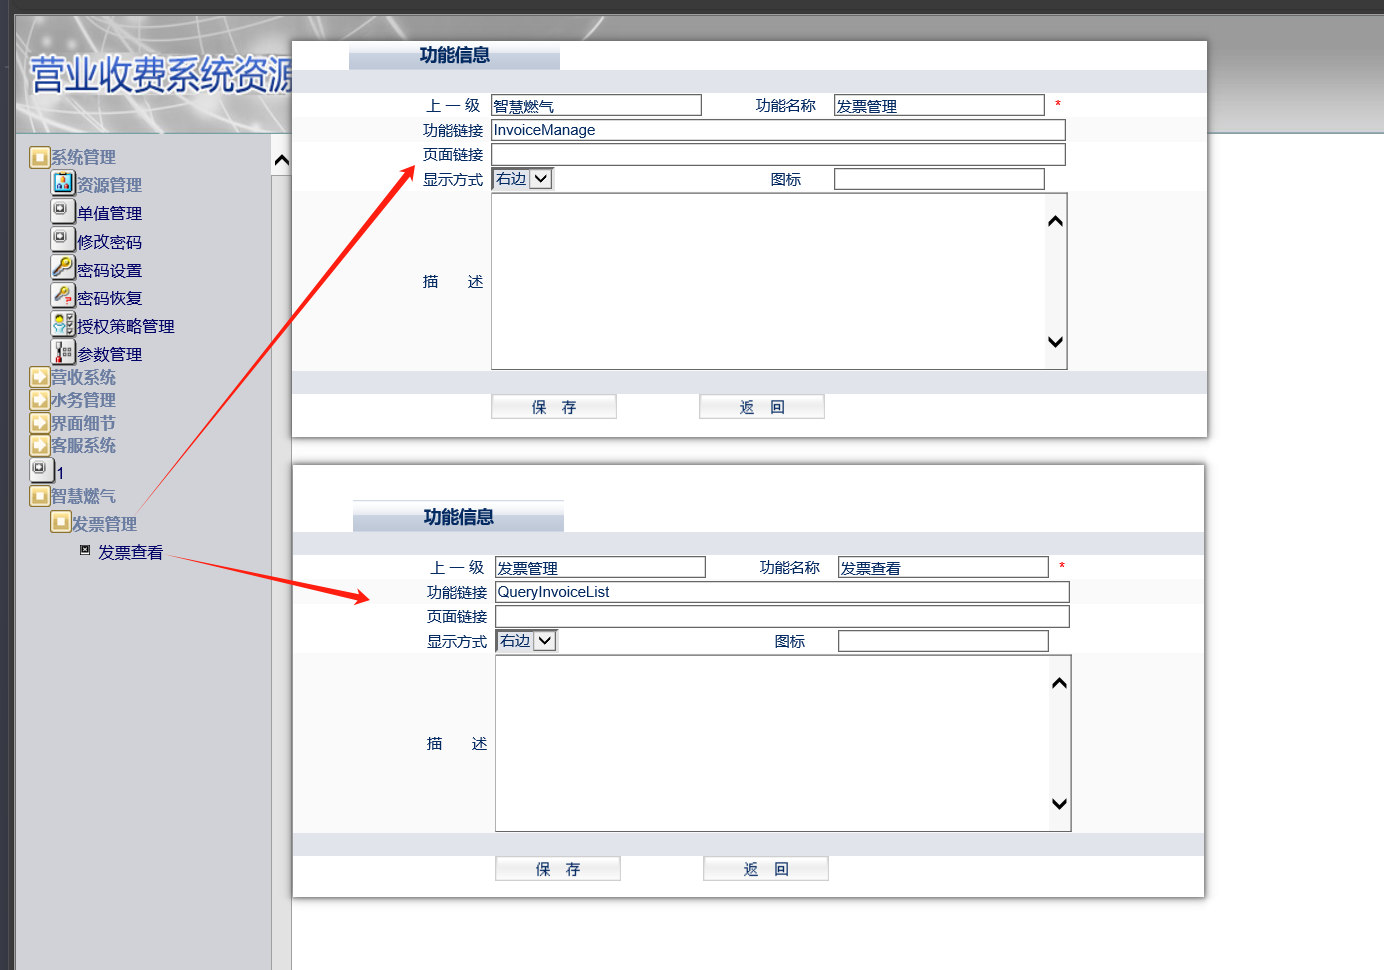
这样配置之后 。v4 项目才能正常加载这个页面
营收系统配置
需要配置个 http 连接到v4 的服务,图示是我测试的服务,实际部署时候需要修改 具体看后面的部署

部署
- 更新 v2 营收系统前台。
- 部署 v4 框架项目。
- 部署需要添加的前端模块,以 invoice-web(发票v4前台) 为例。
- 静态资源更新
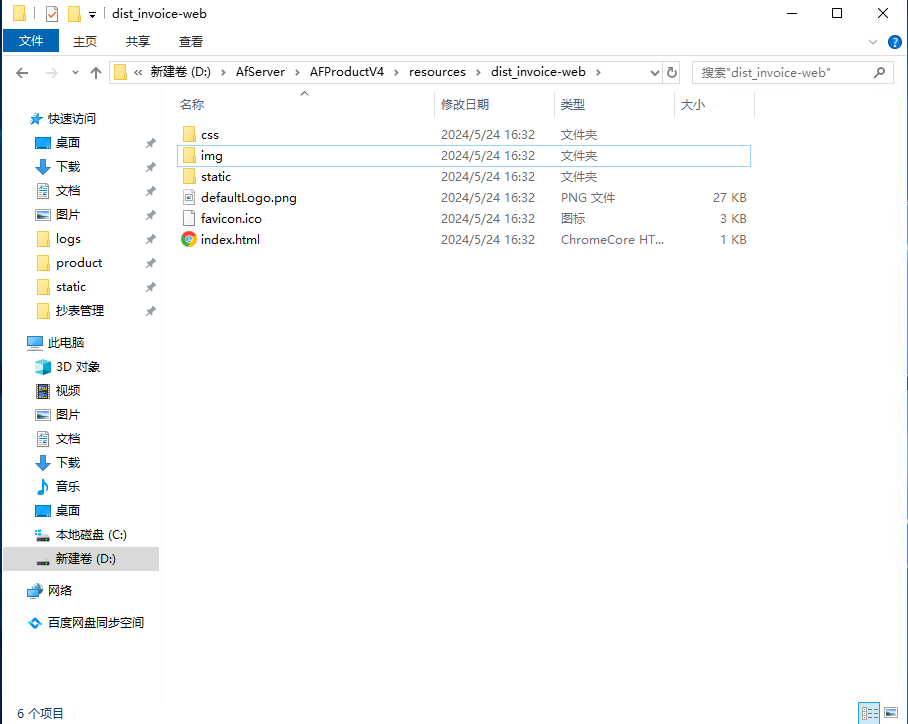
- nginx转发配置 参考实际情况修改
server {
        listen       31468;
        server_name  localhost;

        if ($time_iso8601 ~ "^(\d{4})-(\d{2})-(\d{2})T(\d{2}):(\d{2}):(\d{2})") {
            set $year $1;
            set $month $2;
            set $day $3;
            set $hour $4;
            set $minutes $5;
            set $seconds $6;
        }

        proxy_set_header request_id $request_id;


		#资源管理兼容
        location ^~ /rs/user/ {
            proxy_pass http://127.0.0.1:8099/rs/user/;
            proxy_set_header    Host                             $host;
            proxy_set_header    X-Real-IP                     $remote_addr;
        }

		# v4接口
        location ~ ^/(.+)/api {
            rewrite ^/(.+)/api/(.*)$ /$2 break;
            proxy_pass  http://127.0.0.1:8848;
            proxy_set_header  Host $host;
            proxy_set_header  X-Real-IP $remote_addr;
            proxy_set_header  X-Forwarded-For $proxy_add_x_forwarded_for;
        }

        location /api/ {
            proxy_pass  http://127.0.0.1:8848/;
            proxy_set_header  Host $host;
            proxy_set_header  X-Real-IP $remote_addr;
            proxy_set_header  X-Forwarded-For $proxy_add_x_forwarded_for;
            proxy_set_header  X-Forwarded-Proto $scheme;
        }


        location / {
          if ($request_filename ~* .*.(html|htm)$) {
            expires -1s;#缓存时间,-1代表不缓存
          }
          if ($request_filename ~* .*.(gif|jpg|jpeg|png|bmp|swf)$) {
            expires 30d;
          }
          if ($request_filename ~ .*.(js|css)$) {
            expires -1s;
          }
          #站点根目录,可以是相对路径,也可以是绝对路径
          alias D:/AfServer/AFProductV4/resources/dist_invoice-web/;
          #默认主页
          index  index.html index.htm;
          try_files $uri $uri/ /index.html;
        }

        #禁止访问的文件或目录
        location ~ ^/(\.user.ini|\.htaccess|\.git|\.env|\.svn|\.project|LICENSE|README.md) {
            return 404;
        }

        #一键申请SSL证书验证目录相关设置
        location ~ \.well-known {
            allow all;
        }

        #禁止在证书验证目录放入敏感文件
        if ( $uri ~ "^/\.well-known/.*\.(php|jsp|py|js|css|lua|ts|go|zip|tar\.gz|rar|7z|sql|bak)$" ) {
            return 403;
        }
    }
危险
注意 嵌入v2 系统中 不能使用 v4 框架入口进入否则会跳转到登录页。
所以打包时 .env.production 文件中的 VUE_APP_PUBLIC_PATH 要改成 /
v3 系统 以鄂州举例
1.修改 单页面组件 在vue-client 中,鄂州有单独分支
下面是修改后内容
<template>
  <div id="EmbbedPage">
    <iframe class="embbedpage" :src="getUrl()" frameborder="0"></iframe>
  </div>
</template>
<script>
export default {
  title: '内嵌网页',
  props: {
    domainName: {      //参数domainName,字符串类型
      type: String,
      default: '#'
    },
    title: {
      type: String
    },
    compName: {
      type: String
    },
    // 当前登录用户信息
    login: {
      type: Object,
    },
    // 当前登录用户信息
    param: {
      type: Object,
    }
  },
  ready() {
    // 把登录信息保存到父窗口中
    window.login = this.login
    // 把参数保存到父窗口中
    window.param = this.param

    if (this.compName) {
      window.comp = this.compName
    }
    if (this.title && this.$parent) {
      this.$parent.setTitle(this.title)
    }
  },
  methods: {
    getUrl() {
      // 在url 结尾 拼接token信息
      let token = this.$login.SinglePageToken
      let url = this.domainName
      if (url.indexOf('?') > -1) {
        url += '&token=' + encodeURIComponent(token)
      } else {
        url += '?token=' + encodeURIComponent(token)
      }
      return url
    }
  }
}
</script>

<style lang="less" scoped>

#EmbbedPage {
  height: 100%;
  width: 100%;
  text-align: center;
  border: 0;
  overflow-y: hidden;

  iframe {
    height: 99%;
    width: 100%;
    border: 0;
  }
}

</style>
2.修改登录js中的程序
登录时候保存 SinglePageToken
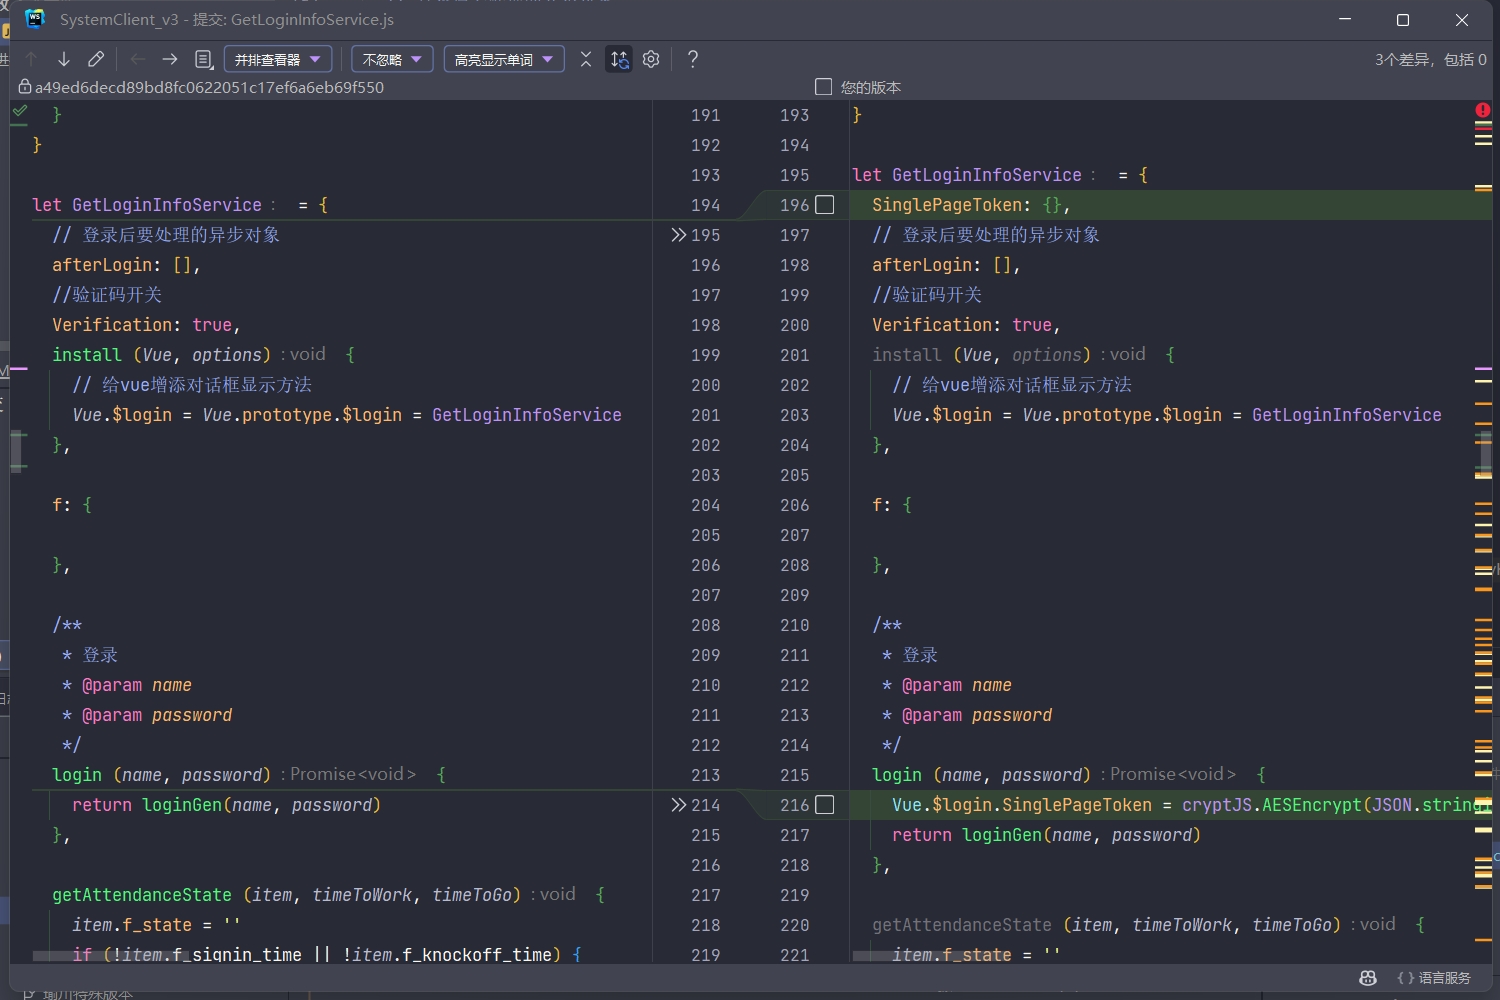
插件和上面提到了 v2 的一样
3. v4打包
src/config/config.js 中 改成V3